Summit – 5,636m.a.s.l. (18,620ft)
Climbing Season – October-March
Time of year climbed – March
Duration – 2 Days
Difficulty –
Pico de Orizaba, Mexico’s highest summit, is an imposing figure, standing tall in the Trans-Mexican Volcano belt and visible from both the Pacific Ocean and the Caribbean Sea on a clear day. As the sunrises it casts a huge domineering shadow over the plains to its west.
It would almost be rude to come to Mexico City and not take in this stunning mountain. A difficult and demanding challenge to climb, but so incredibly worth it.
Preparing for Pico de Orizaba
Having spent some time at higher altitudes, I knew how unforgiving they can be. Determined to summit Orizaba during my trip to Mexico, I wanted to give myself every chance of success and carefully planned my trip to allow me to acclimatise as much as possible before my attempt.
Mexico City itself is no slouch in the old altitude department, sitting at 2,240m. If you’re coming from somewhere like Manchester, at a paltry 40m, a few days spent here can help get you started. And what a place to spend a few days, see my guide on Mexico City here!
Life got in way in the lead up to my Mexico trip and I wasn’t heading out there as fit as I perhaps should have been (more on that later). One too many pies and not enough cardio. I didn’t want to burn out doing training hikes before Orizaba, but needed to do some acclimatization. I settled on climbing Nevado de Toluca beforehand with a rest day afterwards. A stunning volcano in its own right, with a beautiful crater lake, great views and some fun scrambling sections to compliment the hike.


Both this climb and the Pico de Orizaba climb were coincidentally with the same provider, Travesias Mexico, and booked via Get Your Guide. Other popular in-country hikes you could consider doing in preparation are Iztaccihuatl and Malinche.
After Nevado de Toluca I was ready… ish.
Day One
Day one began early. Leaving my hotel in the early hours of the morning, I groggily made my way to the meet-up point, having not slept much that night through excitement (and maybe a little bit of nerves, just a little bit, a smidge). Being acutely aware I wasn’t as fit as I perhaps should be was giving me doubts. This could be a difficult loss to take if I didn’t summit, I might have really let myself down by not being in the proper shape. Something that, really, was in my control.
We left Mexico City and headed for Tlachichuca, a 4-hour drive with a stop for some food along the way. From there we then took a 4X4 to the mountain hut, Piedra Grande, at 4,230m. It was a bone-rattling 2-hour drive. The road is poor and the driving slow.
Spending 2-hours as a whacky-waving-inflatable-arms-tube man was not an experience I had really expected on the trip. But I can tick it off the bucket list, I guess.
After arriving at the hut, we did an hour-long acclimatization hike, gear check, quick bit of food, and then headed to bed to try and get some sleep before our 12:30am start.
Day Two
The big day. The mountain hut was quiet and comfy enough, although sleep had typically eluded me, as it often does at altitude. Off into the darkness I went, a sleep deprived zombie.
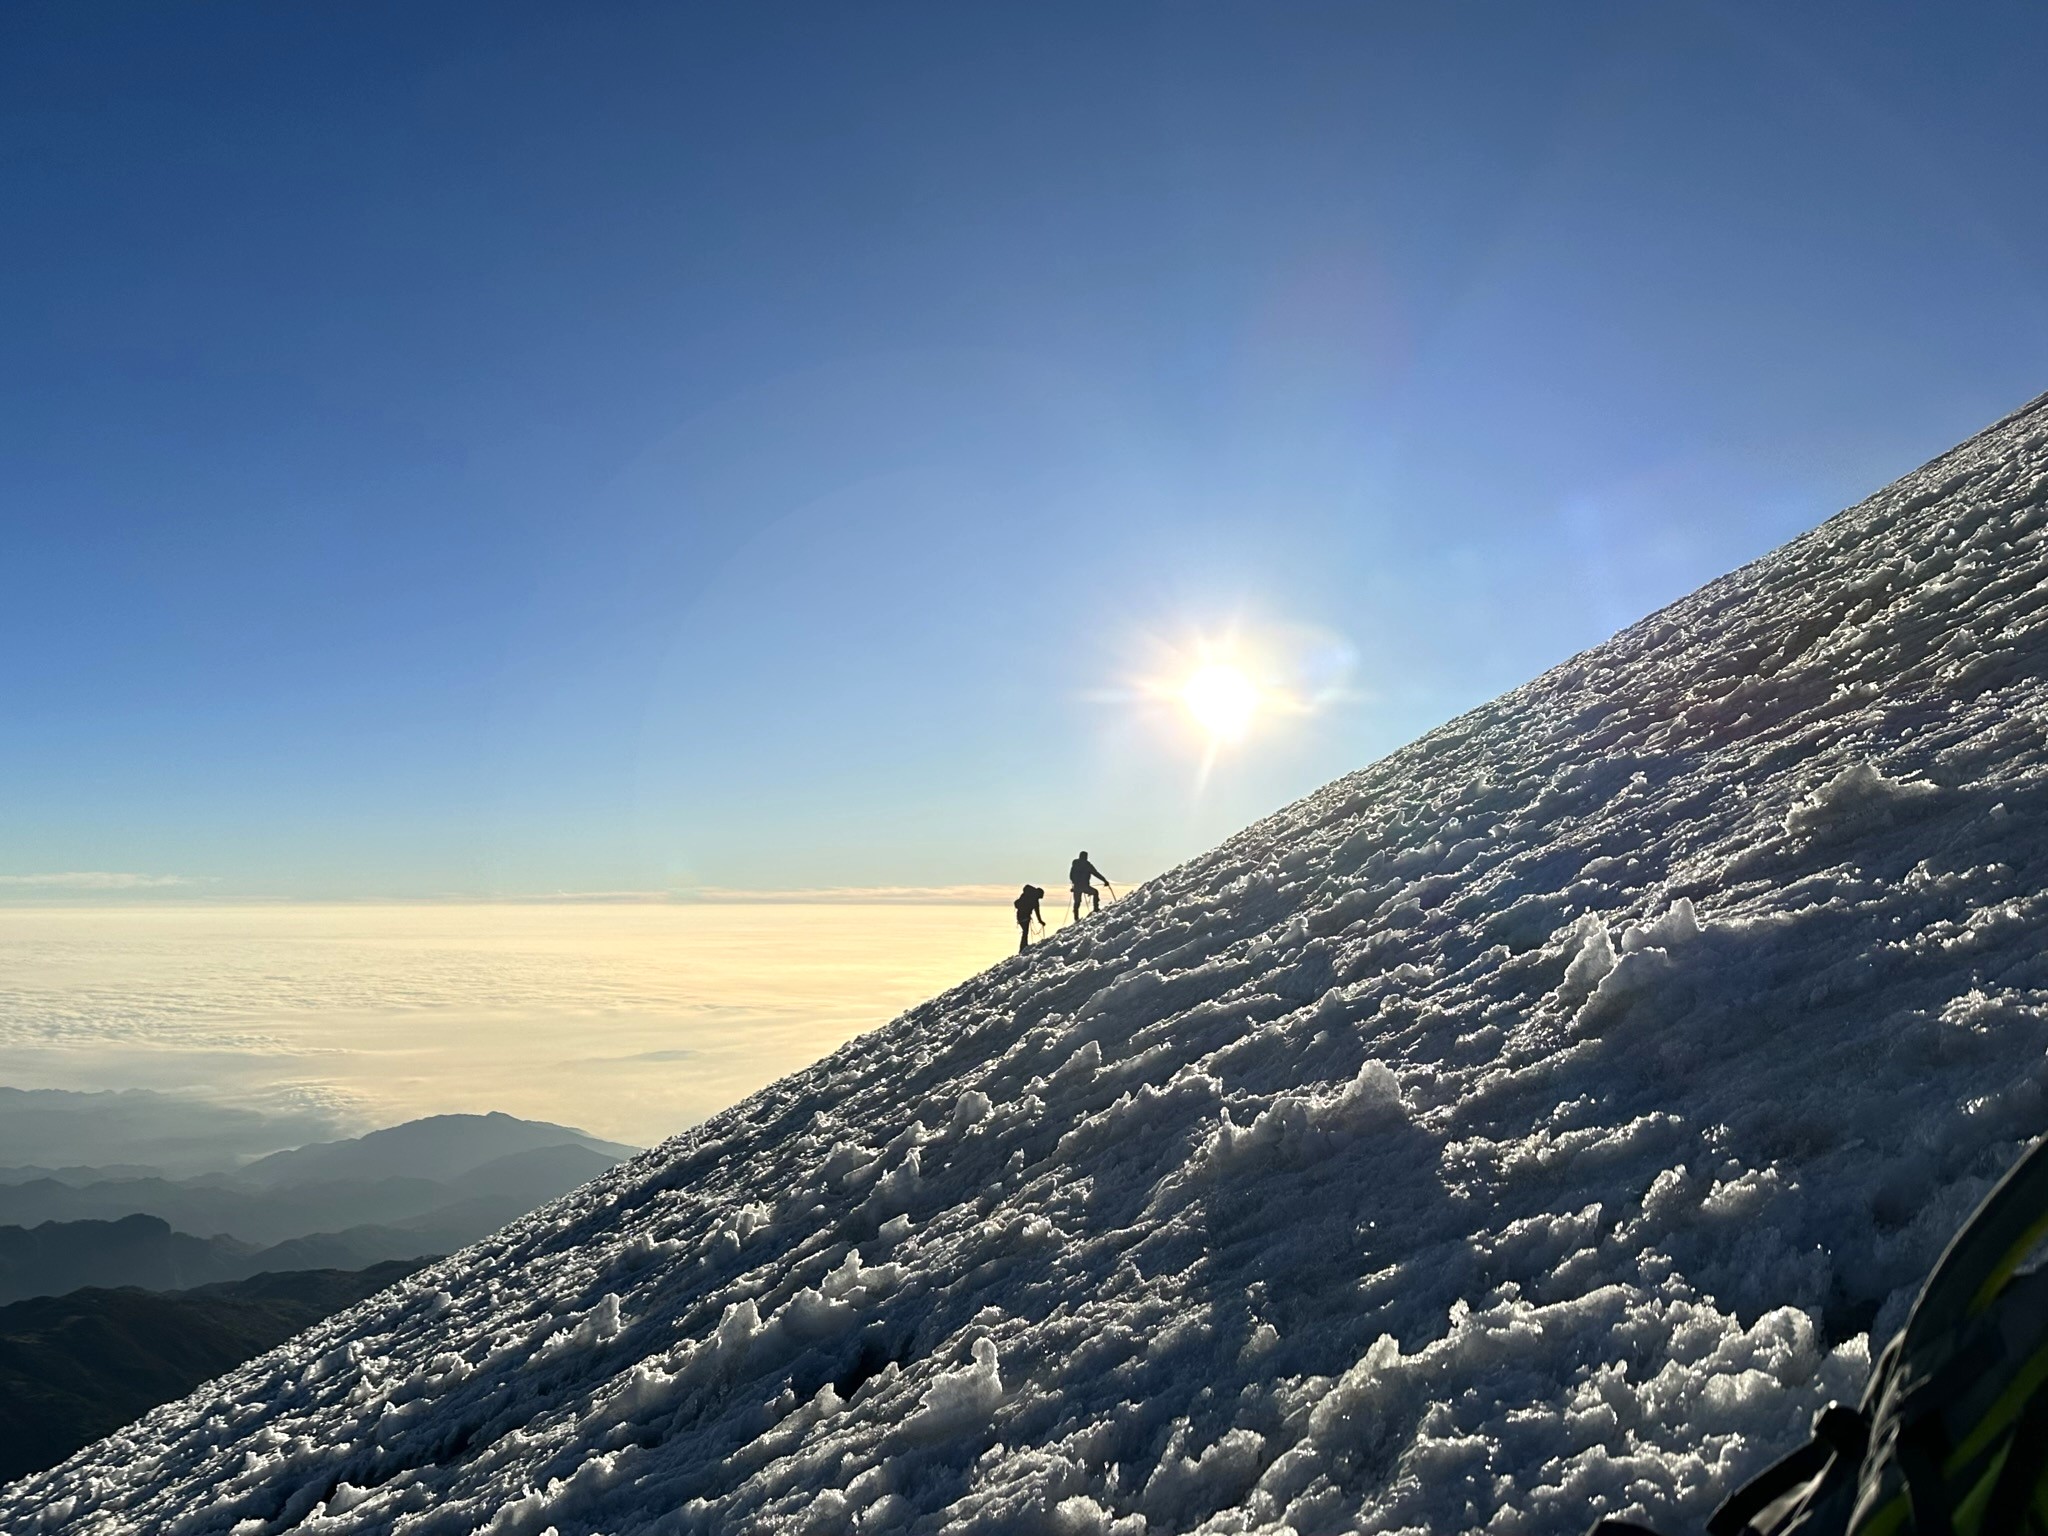
The first 5 hours of the hike were comfortable enough, some steep sections, some scree to navigate. When you arrive at the Jampa glacier at roughly 5,000m though it’s a game changer.
Jampa Glacier
The glacier is incredibly deceptive. The summit feels within reaching distance. It isn’t. It really isn’t.
Crampons on, roped up and ice axe at the ready we set off up the glacier. A beautiful sunrise on the way up, lifted my mood and gave me a second wind as my energy was waning. The warmth of the sun cut through the freezing temperatures of the night that just ended.


Looking up the glacier you always feel so close to the summit… looking back down the glacier, you always feel so close to your starting point. Precious few reference points on the glacier turn this part of the climb into a real slog and a real test of both body and mind. The steepness of the glacier is as much as 45 degrees in places.
It is relentless. Absolutely relentless.
My legs were knackered, and my overall energy levels were getting low. Very low. The extra bit of weight I was carrying around my midriff (from the one too many pies and not enough cardio I mentioned earlier) was the bane of my existence.
But through determination and perseverance, focusing on just one step at a time, and 9 hours after I had set off from Piedra Grande, I summitted. I slumped to the floor on the summit, exhausted. But the views soon had me back on my feet. Absolutely breathtaking.


Homebound
As is always the case, the summit is only half way. Like Scrat, the sabre-tooth squirrel from Ice Age, I squirrelled through my backpack for snacks to refuel, before reluctantly setting off back down the mountain. I was seriously exhausted. A 7-hour descent, filled with many stops and rests, saw me finally arrive back at the mountain hut, rounding off the climb at 16 hours in total.
One more gratis 2-hour whacky-waving-inflatable-arms-tube man experience and it was sweet smooth tarmac all the way back to Mexico City. Happy and Exhausted.
8 Top Tips for Climbing Pico de Orizaba
Here are my top 8 tips for climbing and successfully summiting Pico de Orizaba.
- Train beforehand! Being fit is crucial to summiting. Being unfit is dangerous. I was just about fit enough to safely climb and thankfully good weather allowed me the extra time I needed to summit, but good weather is never a guarantee on mountains, far from it. To put some kind of metric on it, I would say if you can run between a 10k and a half marathon, say 10 miles, you’re fit enough. As well as good cardio, strong legs are also needed, so get on the Stairmaster at your gym, or try using a weighted vest on an inclined treadmill. And of course, get out there hiking!
- Persevere. The glacier in particular is very challenging mentally, prepare yourself for the relentlessness of it and don’t become discouraged.
- Acclimatise. Do some training hikes such as Nevado de Toluca or Izztaccihuatl, both of which are stunning in their own right. Avoid going straight from the plane to the mountain if are coming from somewhere at low altitude.
- Focus on one-step at a time. If you do struggle on the glacier just focus on your next step and distract your mind as best you can, to help keep pushing on.
- Pick your head up. It’s easy to get lost in the challenge of it, with your eyes down, focussed on every step. Remember where you are, stop and look around, take it all in and get some photos
- Hire a guide. Or at the very least avoid climbing alone, unless you are very experienced. People do die on Orizaba, and climbing the mountain shouldn’t be taken lightly
- Bring plenty of snacks. It’s a long day and you’ll need to get plenty of calories in and keep your energy levels up. Make sure you bring all your rubbish down with you as well!
- Temperatures can get well below zero during the night, so make sure you layer up well and keep warm!
Climbing Gear List
- Ice Axe, Crampons, Rope, Helmet – If you use a guide they will be able to supply these.
- 40-50l Backpack with rain cover
- Warm hat
- Sun hat
- Buff
- Sunglasses
- Head torch
- Thermal base layer
- Moisture wicking layer
- Warm insulating layer/s
- Waterproof Shell Jacket
- Hiking trousers
- Waterproof trousers
- Gators
- Hiking Boots – that can take crampons!
- Wool socks
- Liner Socks
- Gloves
- Hiking Poles
- Sunscreen