Summit – 6,088m.a.s.l. (19,973ft)
Climbing Season – May-November
Time of year climbed – May
Duration – 2 Days
Difficulty –
Having never been over 6,000m, climbing Huayna Potosi was number 1 on my list of things to do whilst I travelled around Bolivia. It seemed an unmissable opportunity to go one better than the 5,895m of Kilimanjaro.
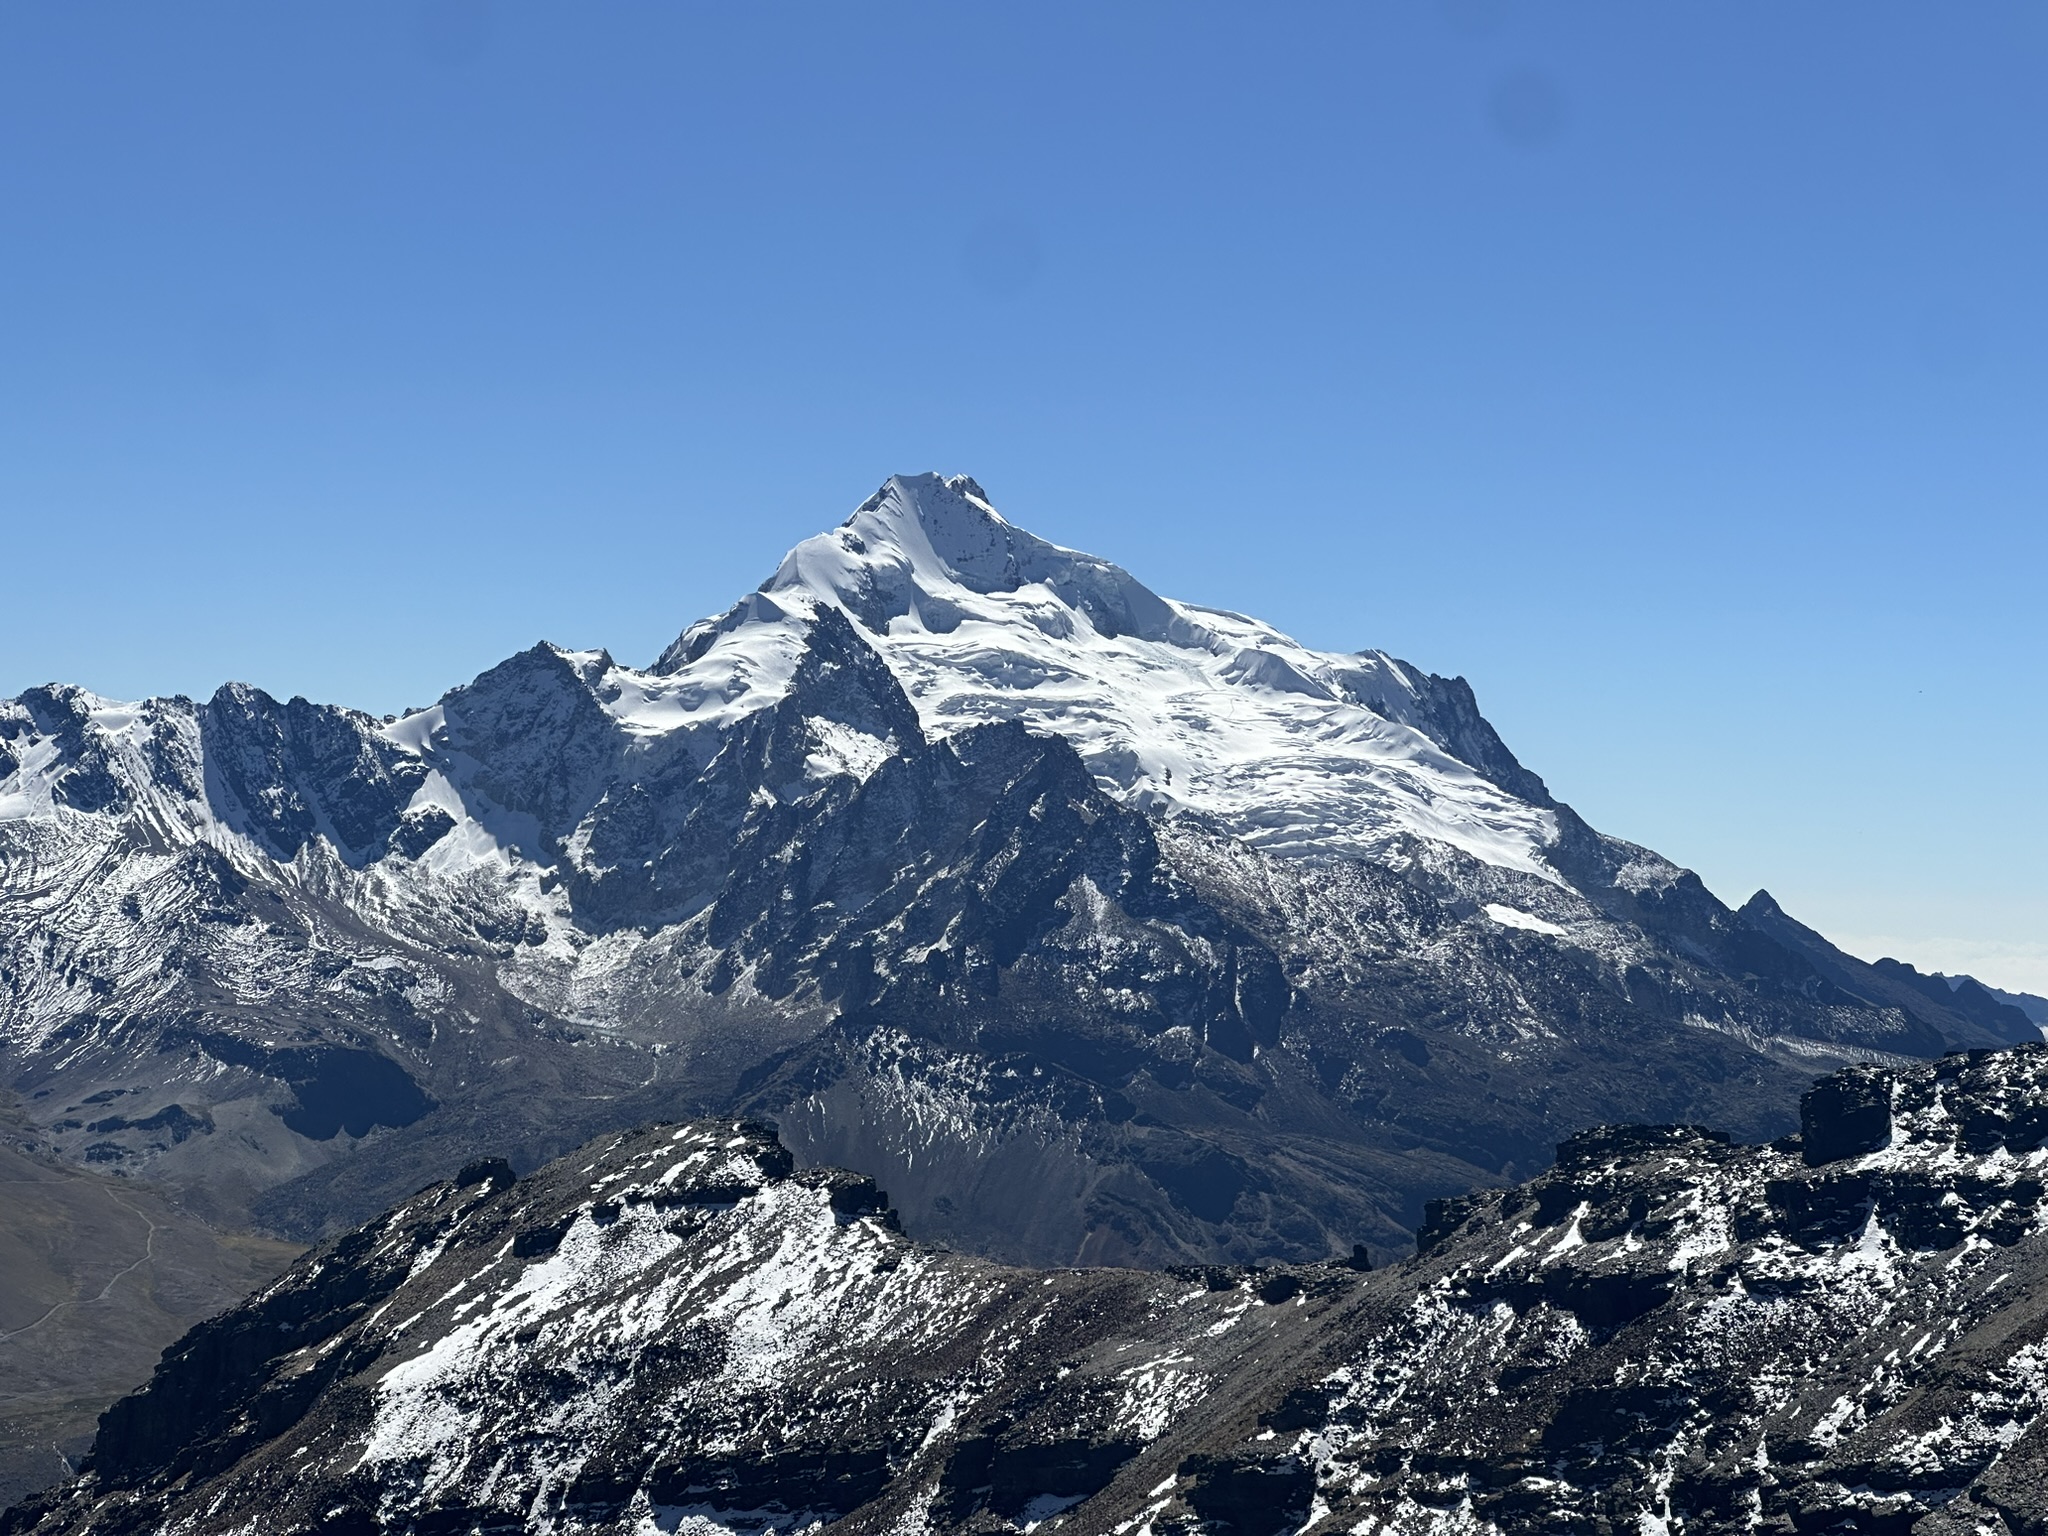
Sitting just 40km outside of La Paz, at 6,088m tall, the Andean giant is often thought of as one of the “easiest” 6,000m+ mountains in the world. However, every pursuit in life has an “easiest”, that doesn’t necessarily mean it’s easy though.
The climb is physically and mentally challenging, navigating rocky terrain, snow, glaciers and freezing temperatures. Not to mention the rarified air that comes with high altitude. But once you hit that sweet snow topped summit, the panoramic views are unbelievable. La Paz, El Alto, Illimani, Mururata, the Amazon Basin, Condoriri, the Cordillera Real, the Altiplano and Lake Titicaca all come into view.
Booking
The post-covid return of tourism, combined with Huayna Potosi being one of the most popular climbs in South America, means the demand outstrips the supply right now when it comes to mountain guides.
I’d highly recommend booking a guide in advance, especially if the main purpose of your visit to Bolivia is to climb Huayna Potosi. Even then there are no guarantees, if a guide is suddenly unavailable, perhaps due to illness, or even double booking, then your climb might be off if there’s no available replacement. With that in mind I would make sure you keep some flexibility in your itinerary as well around when you can do the climb.
I booked my climb months beforehand via bookatrekking.com. In all honesty, I probably paid slightly over the odds in doing so (£300), compared to if i had booked in-country. But at least I had peace of mind that I had a booking confirmed for the climb.
You can book in-country from one of the many climbing companies, several of which have offices in and around the witches market in La Paz.
When it comes to booking you will also need to decide between doing a 2-day climb or a 3-day climb. The difference here is the 3-day climb includes a training day, where you’ll practice some glaical travel techniques, as well as getting the chance to climb an ice wall. Doing the 3-day climb will also help with acclimatisation more, but if time is of the essence then consider doing the 2-day version.
Pre-climb
Acclimitization
One of the main reasons Huayna Potosi is regarded as potentially the “easiest” 6,000m+ plus summit is it’s close proximity to La Paz.
This provides two great advantages. Firstly, the mountain is easily accessible by just a one hour or so drive from the city. More importantly though, La Paz is situated at 3,640m. A few days here before heading to the mountain can provide great acclimitisation and improve your chances of summitng significantly.
With that in mind, I spent around a week in La Paz to acclimitize as much as possible and get completely comfortable at 3,500-4,000m.
La Paz is an incredible city with so much to see and do, check out my top things to do there here.
In order to acclimitise further I also did a couple of short hiking trips to Chacaltaya and Charquini in the few days beforehand, taking me to 5,421m and 5,020m respectively.

Gear Check
Prior to setting of on the climb I visited the offices of the climbing company to do a gear check and fill in paperwork (the usual signing away your life kind of stuff).
Due to the sub-zero temperatures and glacial travel, having the right gear for the mountain is crucial. With my booking all gear rental was included in the price. Which it turned out, was very handy, given what I had taken to Bolivia with me was not going to cut it in the -15C temperatures. With my life signed away and gear all sorted, I was ready to go… almost.
Just 2 days before the climb i was contacted by the company to inform me that there was no guides available due to them being overbooked. I was gutted, especially given I had booked months beforehand to avoid this situation.
Thankfully a solution was eventually found. Rather than having one guide for the three days, i would instead have three different guides I would meet along the way, and I would have Spanish speaking guides, rather than English. Disaster averted, or rather desastre evitado I guess.
Day One
With guide number one of the trip, I set off from the La Paz office around 10am for a bumpy drive out to Huayna Potosi’s Base Camp. A route I was becoming very familiar with after trips to Chacaltaya and Charquini in the days prior. The views on the drive are spectacular, with Huayna Potosi unmissable as it dominates dominating it’s surroundings.


The First Challenge
After a hearty lunch of vegetable soup, followed by plain pasta with a piece chicken (a classic mountain hut meal if ever there was one!), I was handed over to another guide and we then set out for an afternoon of training on the nearby glacier.
After a 40 minute walk we arrived at the glacier and began practicing different glacial travel techniques; footwork, axe work, how to approach slopes of different angles etc. Following about 20 minutes of this it was then time for the main event of the day, ice climbing on the glacier.
We stomped our way further up the glacier to what was around a 40 foot cliff edge in the ice. Looking down I questioned the guide about what route up I should look to take, but between the language barrier and him being slightly disinterested, I got very little back. He himself had just descended from the Huayna Potosi summit that morning and I think he was keen to be done for the day and get home.
Down I went, to the bottom of the wall.
It was around 2pm in the afternoon and as I rapelled down I soon realised the problem I was going to face. The ice wall had been in the intense sunlight for hours, and still was, and the ice was well melted, crumbling away with each contact of my crampons. Once I arrived at the bottom of the wall, a few metres away, and surrounding me, was a bottomless pit of a crevasse. The only way was back up.
It was a long, long, hard slog. The ice constantly breaking away from my crampons and axes. As I tried to kick in harder in some places, i was met with solid rocks just an inch or so past the surface of the melting ice. For every couple of metres I climbed up, i would inevitably slide back down half a metre or so as the ice gave way. Each slide back down exhausting and demoralising me… as well as crushing my family jewels in the ever tightening harness.
The wall was near vertical, with a lessening slope towards the very top meaning the guide was out of sight and unable to, well, guide me really. Other than occasionally shouting down to me “slowly, slowly”.
About two thirds of the way up, and thoroughly exhausted at this point, I managed to get a stable footing and rest a few minutes. Each attempt to then slowly progress from there saw me slide right back down. I was stuck. Tired of slowly, slowly, and in true Jeremy Clarkson esque fashion, I decided speed and power were the only way forward, and with a burst of energy (very possibly the last one I had in me) I managed to quickly scramble up the last 10/15 feet.
I slumped to the floor and lay on the ice at the top for a good 5 minutes, trying to catch my breath, over-exerted and absolutely knackered.
This was suppose to be a light, easy day! What the hell was I in for the next two days?!
After getting back on my feet we descended back to base camp for more food and a much needed early night.

Day Two
After meeting my third and final guide Miguel in the morning, it was time to crack on with day two of the climb.
Day two involved making the roughly 2 and half hour climb from Base Camp, ay 4,400m, to High Camp, at 5,100m. Although a relatively short walk, the 15-20kg back pack, and the ever thinning air, make it more challenging than you might expect.
There was no rush to get to High Camp though and taking it slowly meant conserving energy, as well as more time to take in the stunning views all around.

The biggest challenge on day two really was getting enough food in me.
Despite the prior acclimitisation, going from 3,640m in La Paz to 5,100m at high camp, in just 24 hours, is always going to be challenging for your body to adapt to. The quick ascent had left me slightly nauscious and unable to stomach a large portion of food. I thought it was much better to eat a small amount and keep it down than push my self and end up bringing it all up.
It was a dismal effort with so much food in front of me, one which would’ve caused shock and awe among people who know me much closer to sea level. It was a sensible approach but ultimately meant I was probably having about 1000 calories, whilst burning around 4,000.
Day Three
The big day, the summit day. After a light breakfast, which was really more of a midnight snack, we set off at around 12:30am to tackle the summit.
It was around -5C, with temps of -15C awaiting us on the summit. Even inside the mountain refuge, it had been 0C, which unfortunately meant my phone (which is also my camera) hadn’t charged properly, owing to its dodgy charging socket and my power bank struggling in the cold. I set off with just 14% battery and knew capturing photos would come at a premium as a result.
The ascent starts with traversing over rocky terrain up to the glaciers edge at around 5,300m. From here it was crampons on, roped up and ice axe at the ready as we began climbing the glacier.
Slowly but surely we made our way up the varied incline of the glacier, following a well trodden path. We took frequent breaks and whilst the pace was snail like, we were industrious snails, as we maintained momentum and rhythym up the mountain.
However, after 5/6 hours the lack of food and the over exertion of day one began to catch up with me. I was starting to feel heavy, and there was a long, long way to go yet. The climb became as much mentally challenging as it was physically from there on out.
Pala Chica, the Ice Wall
As the sky began to lighten we arrived at the base of the infamous Pala Chica.
The Pala Chica is probably the hardest section of the whole climb. Starting at around 5,700m, it’s a 150m steep ice wall, with an exposed, narrow, zig-zag path, on a 45 degree incline, leading up it. The path for the most part has fixed ropes to help the ascent feel more secure, but the climb is draining. I think my battery might have been close to my phone’s by the time we hit the top.
From here we made our way over to the final steep section of the climb, the Pala Grande. Reaching the base of Pala Grande, we stopped to take a longer, much needed rest before continuing. It was the perfect spot to sit and take in a beautiful sunrise.
Whilst the sunrise was revitalising, it also shone light on the challenge still ahead…

The Final Push
There was still around 150m of steep ascent to go.
At this point Miguel started to become stressed and anxious. We had taken longer than he had anticipated in getting to this point and he could see I was getting tired. I was quite glad of the language barrier. What does “vamos, bastardo inglés” even mean?
(He didn’t really say that, can’t confirm he didn’t think it though).
After sunrise, the warmth of the sunlight begins to melt and soften the glacier. It becomes destabilised and the danger of snow and rock falls increases greatly. We were now working against the clock to get to the summit and descend safely. Miguel decided that 8:30am would be our turn around time, no summit by then, tough, were heading back down.
… it was 7:10am, time to get moving.


Each and every step up the Pala Grande was a struggle. My legs felt like they were made of led and oxygen was scarce. I was counting out 20 steps in my head before counting out a 15 second rest. It kept me going and pushing up the mountain, but the pace was agonisingly slow, especially with the looming 8:30am deadline. Miguel became visibly frustrated.
Looking up, it felt never ending. So I kept my head down and just kept plugging away, setting small goals and counting out my steps.
All of a sudden, and seemingly out of the blue, I looked up, the ground had levelled out and we were stood on the summit ridge. A short traverse of the ridge and we had made it!
8:26am. Never in doubt…
Out came my phone to capture the incredible, once in a lifetime moment. Passcode entered. Camera opened. Camera pointed. And, in strict adherence to Sod’s Law, battery dead before a single click.
Thankfully though Miguel was able to capture some shots on his phone.


The Descent
After the literally high of reaching the summit, it was time head back down.
The endorphins and emotions of summiting had me bounding back down the mountain… for a little while. By the bottom of the Pala Grande i had fizzled out. If the pace on the ascent was snail like, on the descent it was three-toed sloth like (google has informed me that three-toed sloths are even slower than snails, who knew).

What should’ve been a 3-4 hour descent, took me around 5 and a half hours. An hour long drive after reaching base camp and I was finally back in La Paz, after an incredible few days, absolutely knackered.
I was later told by the guide company, they think it might be the longest descent they’ve ever had. Good to know I guess.
Top Tips for Climbing Huayna Potosi
Here are my tops tips for climbing and successfully summiting Huayna Potosi;
- Acclimatise beforehand to maximise your chances of summiting safely. Spend some time in La Paz, there loads to see and do, including lots of hikes nearby taking you above 5,000m.
- Make sure you are fit, and comfortable carrying a 15kg backpack for around 800m of ascent. It is possible to summit without being in the shape of your life, but the fitter you are, the more enjoyable the experience will be, and the better your chances will be of being successful!
- If you’ve no previous experience of glacial travel or high altitude mountains, make sure to go with the 3-day climb to familiarise yourself with crampons etc.
- Pace yourself. If you go too fast you will burnout in the thin air, which more than just exhaustion, can lead to serious altitude sickness. There were many faster parties on the mountain when I summited and I was actually the last to summit on the day. Of around 40 other climbers though, 7 turned back due to exhaustion or altitude sickness.
- Attitude over altitude as the saying goes. Pack your determination, there’s no easy climbs over 6,000m, and unless you’re exceptional fit and acclimatised, the climb will challenge your perseverance.
- One of the quickest routes to altitude sickness is through dehydration, so stay well hydrated! There is a bit of trade off between carrying water and keeping your backpack as light as possible, but personally i would recommend taking at least 3 litres.
- Take plenty of snacks and eat as much as you can stomach to maintain your energy levels.
- Have the right clothing for the weather. Temperatures can be as low as -20C on the summit, whilst they are a warm 10-15C at the base camp. Make sure you have at least 5-6 layers to keep you warm, including a good down insulating layer. It may be difficult to take layers off whilst on the glacier on summit day, without the faff of taking your harness off, so go for layers that can be unzipped if possible.
- Pick your head up. It’s easy to get lost in the challenge of it, with your eyes down, focussed on every step. Remember where you are, stop and look around, take it all in and get some photos
- And lastly, dont forget the sunscreen, the sun is much stronger at higher altitude. I forgot to apply mine on the descent and had lovely sunglasses shaped tan lines (burn lines) on my face for a week.